The 4-button handheld wireless remote control is the main tool for the coach to control Strike Seeker during a session. Most of the common actions can be accessed using just the remote with a few clicks. Only typing or drawing tasks need the keyboard or mouse, as well as selecting some advanced options.
Note: The directional buttons on the remote can be simulated using the keyboard by holding down the "Control" key and using the arrow keys. This is useful to avoid having to pick up the remote when using the keyboard.
[]
Controller Reference Diagram[]

This diagram is commonly referred to at the "T" diagram because of its shape. There are two parts to the T diagram, the vertical section (shown in light grey) and the horizontal section (shown in dark grey).
Vertical section[]
The options along the vertical part of the T are known as "activities". These activities access the actions that are most frequently needed by the coach during a session. The screen will not change appearance when moving up and down from one activity to the next, only the badge will change appearance to show the currently available actions.
Horizontal section[]
The options along the top of the T are known as "pages". Each page is a separate dialog box that appears in the middle of the screen over the top of the main screen. Operation of the main screen (including ball tracking and replays) is not affecting by bringing up pages, but it is only possible to interact with the page as long as it is visible.
Activities[]
Live activities[]

This is the normal mode of hands free operation where the screen appears as described in the Introduction. Any time a new ball is thrown it will be tracked and the system will return to the live mode, regardless of which activity is currently selected. There is no need to manually return to the live mode before throwing the next ball.
| Button | Action |
|---|---|
| Up | Access the Pages. The "View & Print Results Page" will always appear first. |
| Left | No action. |
| Right | No action. |
| Down | Switch to Paused activities. |
Paused activities[]

These activities are used step through the paused video replays one frame at a time. The "Replay" text on the left and right video panes is replaced by "Paused".
The left and right buttons on the remote can be pressed to show the previous or next video frames on all replay loops. When a replay loop reaches the beginning or the end it will no longer update with button presses.
| Button | Action |
|---|---|
| Up | Switch to Paused activities. |
| Left | Step backwards one frame for all cameras. |
| Right | Step forward one frame for all cameras. |
| Down | Switch to Camera View activities. |
Camera View activities[]

These activities are used to select the camera view in each video pane without using the mouse.
The icons at the left and right positions are intended to evoke the impression of the pair of left and right video panes on the main screen. Video loops remain paused.
Note: This activity only exists in Gold or Platinum Edition systems.
| Button | Action |
|---|---|
| Up | Switch to Paused activities. |
| Left | Cycle through available camera views on the left video pane. |
| Right | Cycle through available camera views on the right video pane. |
| Down | Switch to Camera View activities. |
Compare activities[]

These activities are used to store a set of bowler camera views from a single throw and then recall them later to compare side-by-side with the most recent throw. Video loops remain paused.
Use the left button to store the current set of bowler videos into memory. A blue M in a yellow box will appear at the top left of the screen to indicate that a throw is in memory. Performing this action again with a new throw will overwrite the saved throw with the new one.
Use the right button to begin the side-by-side comparison. The bowler camera view that is currently visible in the left video pane will be the view that is compared.
Note: This activity only exists in Gold or Platinum Edition systems.
| Button | Action |
|---|---|
| Up | Switch to Camera View activities. |
| Left | Store the current set of videos from all bowler cameras into memory. |
| Right | Begin the side-by-side comparison in paused mode. |
| Down | Switch to Archive activities. |
Archive activities[]

These activities are used to either save a single camera view to disk or to print the camera view as hard copy. Video loops remain paused.
Use the left button to save the view that is currently visible in the left video pane to an AVI file on disk.
Note: The folder to save video files to must have been selected in advance using the Options menu.
Use the right button to print the view that is currently visible in the left video pane to a color printer.
Note: The printer to print to must have been selected in advance using the Options menu.
| Button | Action |
|---|---|
| Up | Switch to Compare activities. |
| Left | Save the view that is currently visible in the left video pane to disk. |
| Right | Print the view that is currently visible in the left video pane. |
| Down | No action. |
Pages[]
Note: It is also possible to jump directly to a specific page by selecting it under the "Pages" menu using the mouse instead of clicking through using the remote.
View & Print Results page[]
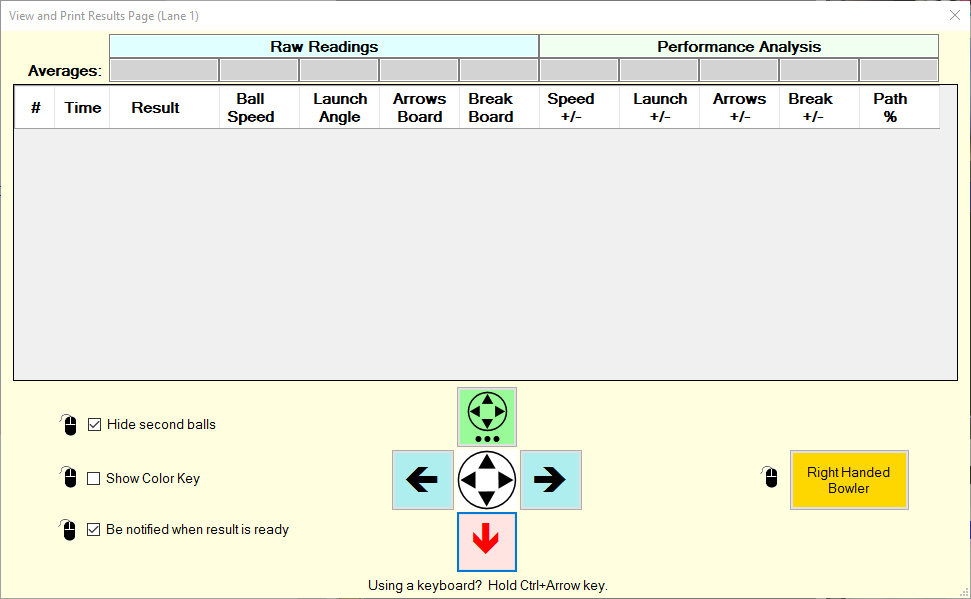

When navigating up from live mode this is always the first page that will appear.
The main feature of this page is the table of results and analyses.
Navigate down from this page to return to live mode.
Main article: View & Print Results Page.
Manage Sessions page[]


This page allows you to start a session for a selected bowler, stop the session, recall previous sessions or e-mail the currently visible results to a student and coach. This is also the place to enable the "Ball Control Drill" where the coach sets speed and position targets for the student.
Navigate down from this page to return to live mode.
Main article: Manage Sessions Page.
Manage Bowlers page[]

This page allows you to add, modify, or remove bowlers from the database.
Bowler data includes first name, last name, whether they are left handed bowlers, and (optionally) their e-mail address for receiving e-mail directly from Strike Seeker.
In addition it shows the date of the most recent session for the bowler.
There is a built-in "Default Bowler" that cannot be edited or removed. It can be used at any time as a convenience.
Navigate down from this page to return to live mode.
Main article: Manage Bowlers Page.
Manage Coaches page[]
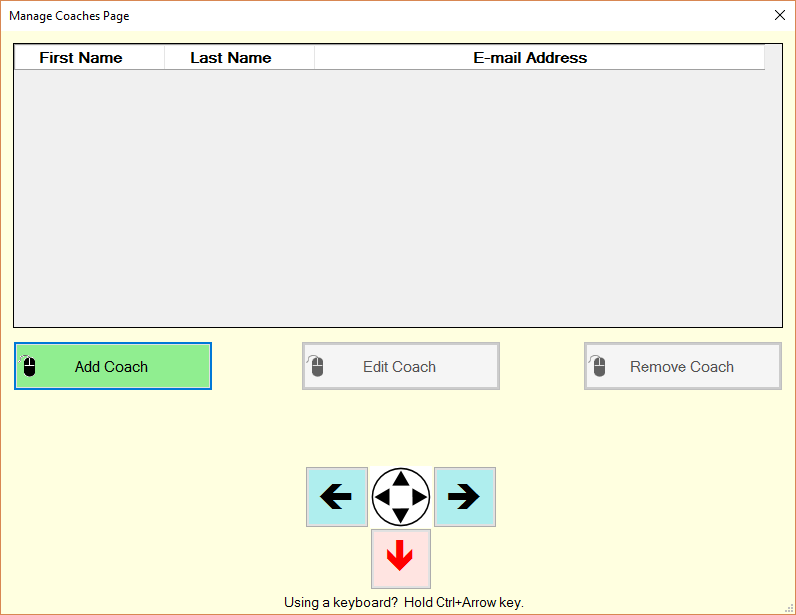

This page allows you to add, modify, or remove coaches from the database.
Coach data includes first name, last name, and (optionally) their e-mail address for receiving e-mail directly from Strike Seeker.
Navigate down from this page to return to live mode.
Main article: Manage Coaches Page.
Print Strike Overlays page[]


This page shows a view of the lane with ball tracks from shots during the current session that were strikes. All other shots are ignored. The ball paths are color coded according to ball speed and the board numbers of each strike shot are shown as + symbols.
Optionally the ball paths can be shown as simple thin black lines.
Navigate down from this page to return to live mode.
Main article: Print Strike Overlays Page.